

QuickBooks Error Code C=51 is usually happens when the QuickBooks TxList files are missing. Although, facing errors while using an application or software is quite normal. If you are also thinking about how to solve the QuickBooks error code C=51, then you are at the right place. In this blog, we are going to cover all the aspects related to the QuickBooks error code C=51. So, if you also wants to know each and every aspect about the methods to fix the problem, then stay tuned till the end of the informative blog.
QuickBooks Error Code C=51
QuickBooks Error Code C=51 occurs when the user searches for the TxList file, but the QuickBooks fails to find that list. This error can be identified by checking the pop-up message saying “QuickBooks fails to find the TxList file”. The fact is a technical or software error cannot occur without any solid reason behind it and it’s important for the user to understand the reasons why the error occurs in order to get the error resolved permanently. So, let’s have a look at the reasons why the error occurs.
Possible Reasons Behind QuickBooks Error Code C=51
So, some of the possible reasons due to why a user may face the QuickBooks Error Code C=51 are as follows.
• Poor or unstable Internet Connection.
• The TxList file is damaged or corrupted.
• When the QuickBooks plan validity has expired.
• When there is an issue in the QuickBooks database server management.
• Background running antivirus applications are disallowing the QuickBooks to work efficiently.
• QuickBooks rebuild error can also cause the C=51 error.
Files Required to Solve QuickBooks Error Code C=51
Before you directly jump on to the solution process for getting the error resolved, first of all, you must make sure that you have the below-mentioned files. These files will help you to get the error resolved.
• Previous backup files off QuickBooks data files (.QBW)
• QuickBooks Transaction log files (.TLG)
• QuickBooks Data file
How to Solve QuickBooks Error Code C=51
Once you are cleared with all the possible reasons due to why the QuickBooks error code C=51 occurs, then let’s have a look at the solutions or methods that you can follow to get the problem resolved.
Solution 1: Repair QuickBooks Data File
When there is an issue with the QuickBooks data file, then repairing that data file can help to solve the QuickBooks error code C=51. So, here are the steps that you can perform to repair the QuickBooks Data file.
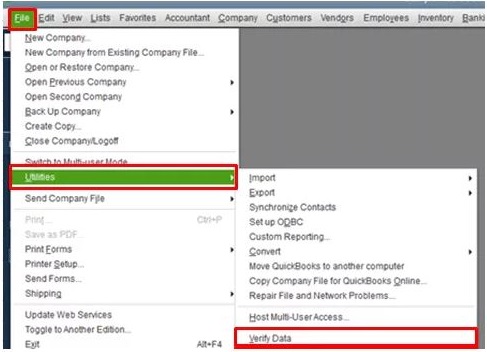
• First, run the QuickBooks and go to the “File” menu and then click on the “Utilities” option.
• Then under the “Utilities” page, click on the “Rebuilt data” option.
• Now, follow the on-screen steps to save a backup of the company’s file.
• The tool will start working on repairing the file and will take a few minutes to complete the process.
• Once the process ends, then click on the “OK” option.
• Now, again click on the “File” menu and go to the “Utilities” page.
• Now, click on the verify data option.
• This tool will now start looking for the issues in the data or files.
• If the tool finds any issue with the file, then click on the “Rebuild Now” option.
Once the rebuild data process ended, then launch the QuickBooks again and try to find the TxList file again. If you did not find the file, then it indicates that the error is still present.
Solution 2: Recover the Lost Transactions in QuickBooks
The process that you can follow to restore the deleted transactions in your QuickBooks desktop application is as follows.
• Go to the QuickBooks Desktop and then click on the “Settings” icon.
• After that, click on the “Audit Login” option.
• Then apply search filters for the transactions and make sure to select the user, time range, and event for which you are looking for the deleted transactions.
• Once you have made changes in the filter, then click on the “Apply” option.
• Now, on the transactions list, press the Ctrl + F key together and type “delete” in the insert box, and press enter button.
• After that, go to the history section and click on the view option.
• Now, shift the tab to the “Event Column” and save all the details and transactions.
• You can now easily restore these transactions in your QuickBooks and you must make sure to use the initial date of the transaction.
Now, you have successfully restored the deleted transactions in QuickBooks. Try to find the TxList file again and check if the error has been resolved or not.
Recent Added : Quickbooks online login problems
Solution 3: Update the QuickBooks to the latest version
Sometimes, updating software or application to the latest available version can also lead to the solution of the problem. So, here are the steps that you can follow to update the QuickBooks to the latest available version.
• First, run the QuickBooks application and go to the “help” section.
• Then under the help drop down list, click on the “Update QuickBooks” option and further click on the “Update Now” tab.
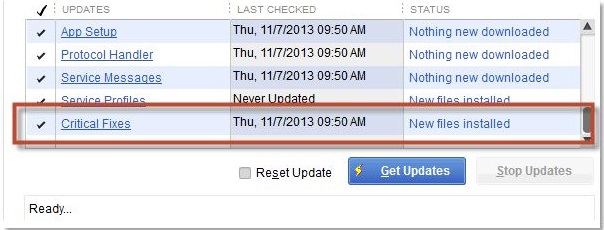
• At last, click on the “Get Updates” option to start the downloading process.
The downloading process will take a few minutes depending on your internet speed and as the downloading ends, then restart your PC and launch the QuickBooks again.
Read Also : QuickBooks error 80070057
Solution 4: Recover the QuickBooks Company’s Backup File
So, the procedure for restoring the QuickBooks backup file is as follows.
• First, open the QuickBooks Desktop application.
• Now, click on the “File” menu option and then click on the “Restore Company” option.
• Then move ahead by clicking on the “Restore a Backup copy” option and then click on the “Next” option.

• Click on the “Local Backup” > and then on the “Next” option.
• After that, browser the cursor’s location to the folder where you have saved your QuickBooks company’s file. It will be named in the format of [company’s name].qbb
• At last, select the location where you want to restore the company’s file and click on the “open” option.
• Click on the “Save” option and now you have successfully restored the QuickBooks backup file.
Conclusion
Above we have mentioned four methods that you can follow to solve the QuickBooks error code C=51. We hope that with the help of this blog you will get a clear approach to the error and how to get it resolved. Even after following all the above-mentioned methods, if you are still facing the error, then you can seek help from our professional experts. Our experts will be happy to assist you in the best possible way.